DIY Nursery With Custom Closet Changing Station And Reading Nook


The moment my wife and I found out we were having a baby, we started thinking about what we would need to get done before our baby was born, as well as what would make life easier for us. The number one thing for us, was a functioning nursery.
What I mean by “functioning nusery” was to create a room that makes our jobs as parents as simple as possible. The baby isn’t going to remember or even really care about their room the first couple of years, however it’s something I doubt any parent ever forgets. So our baby’s room is really a room for us to enjoy watching our baby grow, as well as a room that was well planned out and everything we would need was easily accessible.
After looking at literally hundreds of ideas from other “do it yourselfers” we made a list of things we wanted in our nursery. First, we wanted to change the full size closet into a baby changing station, complete with dresser drawers as well as storage above the changing station. By putting the changing station in the closet as well as dressers, it left more room in the nursery for other furniture. The second thing we wanted was of course a crib and a full size custom bed that we could rest in, if we needed to get up in the middle of the night with our baby. (Of course we wanted the full size bed to be super cute, so it would fit in with our nursery theme.)
After checking prices of lumber, we quickly decided to build everything out of Plywood. The total build took ten sheets of plywood. Each sheet cost $31.98 from Home Depot. Alright, let’s get started!
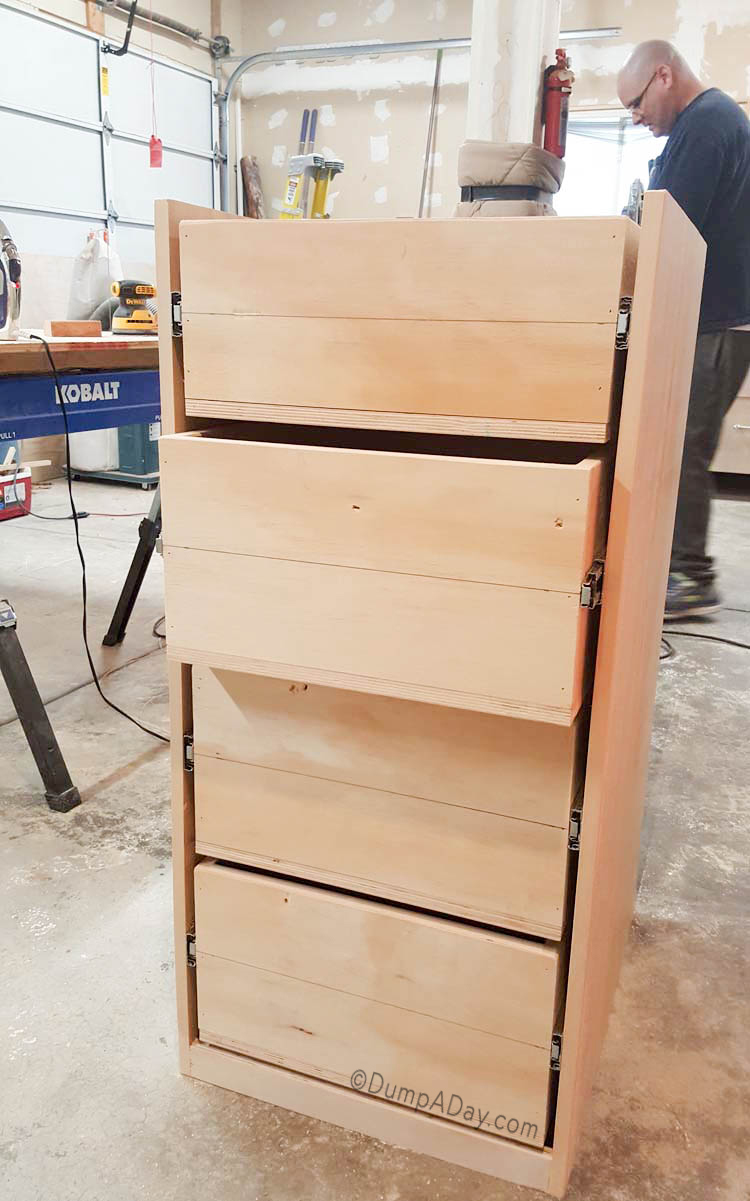
First we started by building the dresser drawers for the closet.
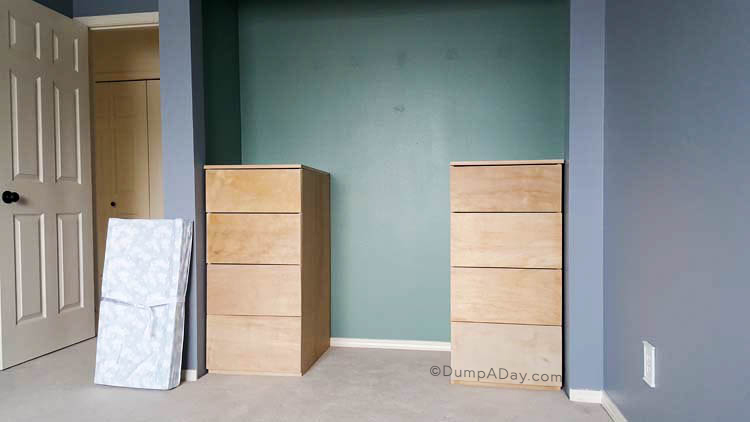
After building each dresser, my wife and I put them in place to make sure they were a nice fit.
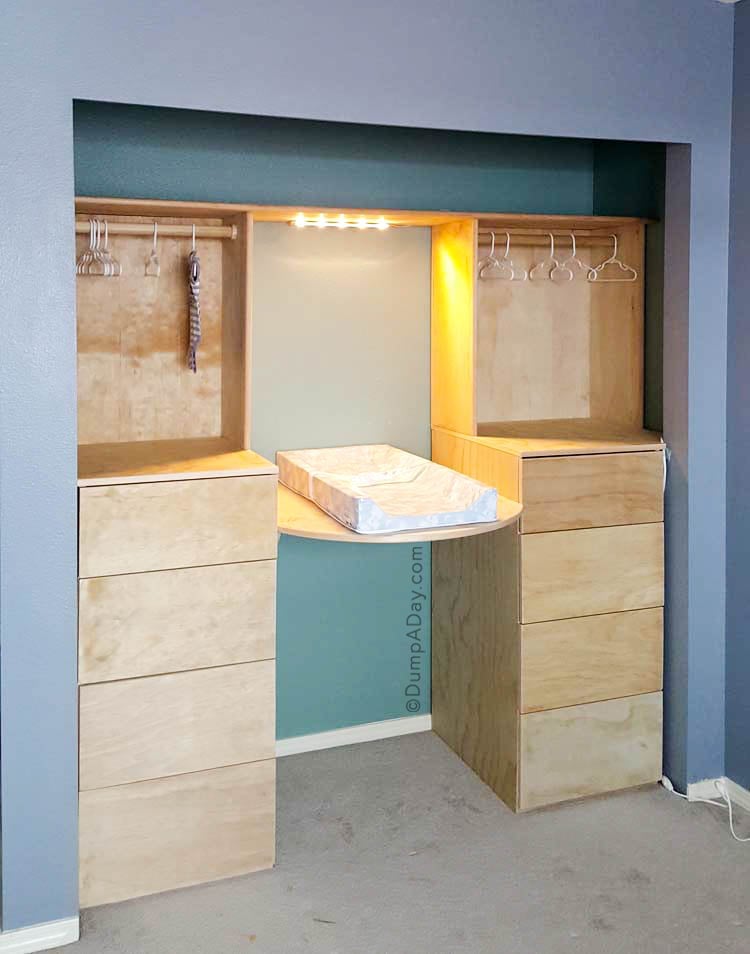
Then we bought a changing mattress and after taking measurements off of it, we installed the changing table for the mattress to lay on.

Next was adding the top part. We also added a light, because the closet wasn’t very well lit.

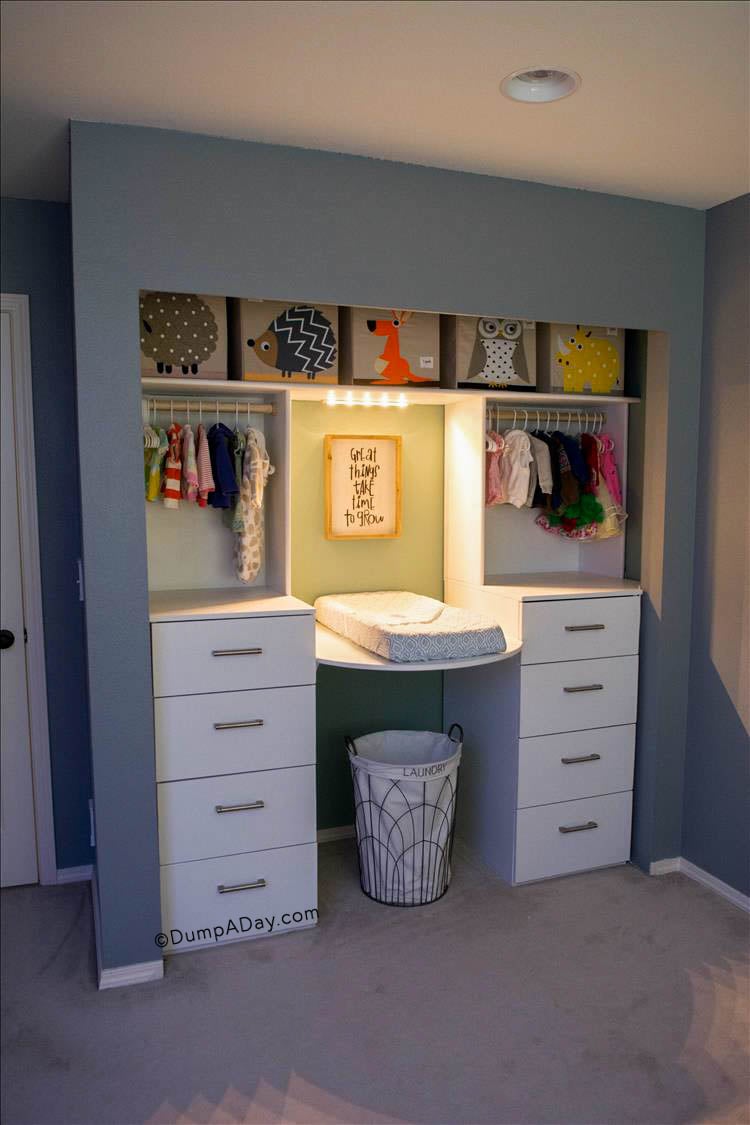
Once everything was secured in place, we painted both the primer coat and a top coat of white.

For the most part, the closet changing station was complete. Next, we decided to build the crib. The first thing we did was go and buy a crib mattress so we could get dimensions on how big to build the crib. (also, at some point, obviously we would need a crib mattress.) Once we had the dimensions, we quickly figured out that once the crib was built, it would not fit through the nursery door. Meaning it would have to be assembled in the room. (annoying) Alright, lets get this crib built. We started by cutting all the pieces and then ironing on 3/4 inch wood veneer to give the edges a clean smooth look.


Once all the pieces were cut, the edging applied and sanded we started drilling pocket holes so we could attach all the pieces.


Now that all the pocket holes have been drilled, the fun part begins! Assembly!

Once all four sides were put together we used some clamps to hold them in place so we could get a good idea how it was looking.


Next we made the two drawers that will go under the crib.


Once everything was complete we took apart the crib and carried all the pieces up to the nursery and reassembled it. Then we put a primer coat on it and added trim pieces and handles on the drawers.

We knew we’d need to apply a couple more coats of paint to the crib, and decided to finish building everything in the room and then paint everything all at once. So now we moved onto making a sleeping area / reading nook. We wanted a sleeping area so if my wife or I had to get up in the middle of the night with our baby then we could actually just lay down next to the crib and not have to keep getting up and going from our room to our baby’s room. Alright, lets build it!


For the mattress, we just bought a 3 inch memory foam mattress topper off of Amazon and then cut it in half, then stacked them, making a 6 inch memory foam mattress. Also, as you can see we started out making a fun house like bed with book shelves, however once we brought all the pieces up into the nursery, we quickly realized that it over-whelmed the room by it’s size. So we simply took the front two posts and roof line off. And then made picket fence arm rests on each side.

Now that everything has been built, we moved onto the finishing touches. We placed the mattress onto some plywood and made a custom sheet for it. Then we painted both the crib and bed / reading nook. Once the paint was dry we installed some fun lights. Lastly we bought a glide rocking chair and some storage boxes for the top of the closet.


We really like how it turned out. The total build took us just over 3 weeks, as we were only able to work on it a couple hours a day. Below are a list of tools and supplies we used if anyone wants to build their own fun nursery. Thanks so much for checking ours out.
Plywood from Home Depot
Drawer Handles
Drawer Glides
Fun Lights
Closet Storage Boxes
Foam Mattress
Glide Rocking Chair
Crib Mattress
Laundry Basket
Kreg Pocket Hole Jig
Kreg Pocket Hole Plugs
